Friday, July 27, 2012

Creamy Lemon Chicken Pasta

It's summer!  It's also ridiculously hot when there is no AC.  I have been trying some lighter flavors to make up for the heat, thus my new obsession with lemon.

Creamy Lemon Chicken Pasta

16 oz penne pasta, cooked according to directions on package (no salt)
1 tbsp cooking oil
4 cloves garlic, minced
2 1/2 pounds chicken breast, cut into strips
8 oz. heavy cream
1 cup chicken stock
1 additional chicken bouillon cube
4 tbsp lemon juice
1/2 cup parsley
3 cups shredded mozzarella cheese

Heat oil in a large skillet over medium-high heat.  Add garlic, cook for one minute.  Add chicken and cook until lightly browned.  Add chicken stock, lemon juice, and bouillon cubes.  Cover and simmer at least five minutes, or until chicken is cooked through.  Stir in pasta and parsley.  Once pasta is heated through, add cream and then stir in cheese.

The hubbs loved this one!

Lemon Chocolate Drum Torte


There were two major problems with this particular experiment, though I plan to fix both of those the next time I make it, since both were "user" errors. The first was when I was making my ganache. I had it chilling in an ice bath in the sink, and some water got splashed into it, making it less solid than I wanted it. The second was using too much batter in each layer (I originally used two cups), and the layers were less spongy than I wanted them, and a little more solid. I have fixed the second error in the recipe. The first...well, just don't forget you have ganache chilling in the sink when you make this.


Lemon Chocolate Drum Torte

Ganache (Make this several hours ahead, or the night before)
16 oz semisweet chocolate
6 oz milk chocolate, finely chopped
2 cups heavy cream
8 tbsp butter, cut

Sponge Cake
24 large eggs, separated
2 cups sugar
4 tsp lemon extract
2 2/3 cups cake flour
4 tbsp butter, melted
2 tbsp lemon juice

      Prepare ganache early: Combine chocolates, cream, and butter in top half of a double boiler. Stir together as all elements melt, until smooth. If you do not have access to a double boiler, combine your chocolates in a large bowl, preferably metal, and heat cream to boiling over medium high heat in small saucepan. Pour boiling cream over chocolate in bowl, and let stand 1 minute. Stir with rubber spatula until smooth. Stir in butter until melted and smooth.

      Chill ganache in refrigerator at least 4 hours or overnight. If in a hurry, set bowl in ice bath and chill about 20 minutes, until thick, stirring occasionally. I don't care for the ice bath method, for several reasons now. My best results with this ganache have been when I chilled it overnight, then let it stand the next day until it was room temperature, stirred easily, and spread easily.

      Once your ganache is warming to room temperature (if refrigerated), prepare the sponge cake: Preheat oven to 400. Grease bottoms of two 9-inch round metal cake pans (I used heart shaped pans, though I have also used the bottom of a bundt pan so I could make it into a wreath). Line each pan with a 9-inch reusable non-stick bakeware liner, or kitchen parchment, or waxed paper; grease parchment or waxed paper.

      In a small bowl, with mixer at high speed, beat egg yolks with ½ cup sugar about 10 minutes, until thick and lemon colored. Beat in extract; set aside. 

      In a large bowl, with clean beaters and with mixer at high speed, beat egg whites until soft peaks form. Beating at high speed, gradually sprinkle in remaining ½ cup sugar, 2 tbsp at a time, beating well after each addition until sugar dissolves and whites stand in stiff peaks. 

      Transfer yolk mixture to very large bowl. Gradually sift in and fold flour into yolk mixture, then fold in melted butter and lemon juice until blended (add food coloring if desired...I do, because I like my lemon cake to be yellow).

      With spatula, fold beaten egg-white mixture into yolk mixture, one third at a time, just until blended. 

      Spoon about 1 cup batter into each prepared pan (Do NOT use too much. If you are using a larger pan, you can use more, but you want your layers very thin). With spatula, spread batter to even thickness. Bake cake layers about 10 minutes, until lightly golden and cake springs back when gently touched with finger. Loosen edge of each layer with spatula, and invert onto wire rack to cool completely. 

      When pans are cool, repeat with remaining batter to make remaining layers. Stack cooled layers between sheets of waxed paper.

      Spread 1/3 cup ganache on one cake layer. Top with second layer and spread with 1/3 cup ganache. Repeat until all layers covered and cake is assembled.  I added some chocolate chips on top, for a little texture.

 Assembled cake

Chocolate Chocolate Chip Almond Cookies

I decided to modify my regular chocolate chip cookie recipe for a church dinner tonight.  It started with me eying the Hershey's Special Dark cocoa powder in my cupboard and thinking of making chocolate chocolate chip cookies, and then I decided to add some almonds I had in the freezer for a little texture.  Here goes:

Chelsea's Chocolate Chocolate Chip Almond Cookies

Ingredients:
3 1/2 cups flour
1 tbsp baking powder
2 tsp baking soda
2 tbsp Hershey's Special Dark cocoa powder (or your preference in cocoa powder)
1 tbsp cinnamon (Makura is the only way to go)
1 c. butter
1 c. white sugar
1 c. light brown sugar
3 eggs
1 tbsp light corn syrup
2  tsp vanilla extract
1 tsp almond extract
pinch of nutmeg
12 oz chocolate chips
1 cup sliced almonds

Preheat oven to 325.  Cream butter.  Add sugars, then eggs, corn syrup, and extracts and mix thoroughly.  Add baking powder, soda, cocoa powder, nutmeg and cinnamon and blend well.  Add flour and mix until blended.  I use my mixer all the way up to the point where I add the chocolate chips.  Stir in chocolate chips and sliced almonds.  Roll spoonfuls of dough into small-ish balls and place on an ungreased cookie sheet about 2 inches apart (I use my Pampered Chef stoneware for cookies).  Bake for 10 to 12 minutes until puffed up.  Enjoy!

Just out of the oven

Monday, July 9, 2012

Beef Dumplings

My husband was begging me for pork dumplings, but finding ground pork around here is a difficult task.  Sometimes I get lucky and can stock some in the freezer, but I haven't run across any in a month or two, so I don't have any here right now.  He fussed at me a bit, and then insisted that I try my pork dumpling recipe with beef, and it actually turned out quite delicious.  He is now insisting that I only make dumplings with the beef from now on, because they were so good.  Here is what I did:

Beef Dumplings

2 pounds ground beef, uncooked
3 tbsp minced garlic
1 1/2 tbsp sesame oil
1 tsp ginger
4 tbsp soy sauce, or more to taste
1 cup heavy cream
1-2 packages pre-made wonton wrappers

Puree all ingredients except meat in blender.  Pour the mixture over your meat (beef, pork, whichever you decide to use), and mix together well.  Fill your wonton wrappers with the mixture (I buy these in the salad section at my local grocery store, and if a store way out here in the middle of nowhere has them, you should have no trouble finding them wherever you are).  I use about one teaspoonful per wrapper, and then fold them according to directions on the package, using a drop of water to seal the edges. 

 Dumpling prep

I steam my dumplings in a double boiler.  I use cooking spray to keep my dumplings from sticking, and steam them for at least 20 minutes, or until the meat is cooked through.  Before my husband got on his health food kick, we did fry some of them in our Fry-Daddy, and the fried ones are pretty tasty also.

Steaming in the double boiler

My only problem with this meal is that I can only steam 9 dumplings at a time in my double boiler, so I made him dinner, then I steamed some for myself afterwards. 

 My husband's plate before he ran off with it

When frying, it is a little easier to make more at once.  This isn't the most practical meal when all the children are home, but fortunately, it was just me and the hubbs, so it wasn't a problem.  As always, let me know if you have any questions or suggestions.


Sunday, July 1, 2012

Enchiladas, Attempt #4

 Okay, just to make sure we're keeping track of the changes, I am re-posting the full recipe (with changes) this time.  I was out of ground cumin, so I actually had to make a minor substitution, and I nixed the chili powder altogether this time.  I also doubled the amount of sauce I made for a single batch.  Here are the results:

Enchilada Gravy

1/2 cup vegetable oil
1/2 cup flour

1 tsp pepper
4 tsp garlic powder
1 tsp Zaatar* substituted for the ground cumin, though not knowing how it would change the flavor, I only used the one tsp
1 tsp oregano
8 cups tomato broth (tomato bouillon and water)

Using a cast iron skillet:  Heat oil over medium heat and add flour to make a roux base.  See Attempt #2 if you have any questions about the base.  Let your roux cook for few minutes, while stirring, until it turns light brown in color, about the color of peanut butter.  Add the dry ingredients, including the tomato bouillon, and continue cooking for about one minute.  I measure them out in advance into a little bowl, and when the roux is ready, just dump them in together to keep from burning my flour.  Once your mixture has cooked for one minute, add the water and stir until it is mixed.  I started with one cup, just to make sure it mixed properly, then slowly added the rest, two cups at a time.  Bring it to a boil, then turn heat to low and simmer for about 15 minutes or until at desired thickness. 

The Rest of the Deal

2 dozen corn tortillas
3 cups shredded mild cheddar cheese
2 cups shredded Mexican blend cheese (I use this now instead of the taco blend, since that one has additional spices that I don't want to interfere with my gravy flavor)

Preheat your oven to 325.  Once my sauce was completed, I used about three to four ladles worth of the gravy to cover the bottom of my casserole dish.  Heat some cooking oil in a small pan and run your corn tortillas through the oil until they float, and pull them out and set them aside on a paper-towel lined plate.  Sprinkle cheddar cheese (around a tablespoon) in the middle of each tortilla and roll it up.  Smoosh them as close as you can together.  I have found that it will keep the cheese from running out too much.  I have found that my pan will fit two dozen, though you may have to 'trial and error' to determine how many you can fit.  Once you place them all, but them in the oven and let them bake just long enough to melt the cheese.  My oven takes about 8 minutes. Last time, I poured my remaining gravy over the top and let the heat from underneath melt the cheese.  This time, I took the suggestion of a friend, and served them straight out of the oven, and waited until they were on the plates to cover them with the gravy and let that melt the cheese.  I have to say, this method was perfect.  Everyone got enough sauce, it didn't thicken up from the heat, and there was plenty of sauce left over for tomorrow's lunch.  Honestly, the flavor this time was actually the best so far as well, though I may go back to the cumin once I have time to go to the store and pick some up.

Mmmm...dinner tonight.  Looking at this makes me want seconds...

*side note:  Zaatar is a seasoning blend consisting of thyme, toasted wheat, toasted mixed spices, etc. that I picked up on a whim in the Indian grocery store near where I used to teach music lessons in Pearland, Texas, simply because I liked the way it smelled.  This was the first time I have actually used it.  I have no idea if it is available elsewhere, but it has a similar scent to the cumin, and the taste this time was the best I have made so far, and I'm inclined to try using it again.

Apple Praline Roll Cake

I got home from church today feeling the urge to make something sweet.  I have a sick love for praline, and I decided to do some experimenting, since it has been a while since I had any.  This was the fruit of my labor, and I can't wait to taste it!

Apple Praline Roll Cake


Cake
1 box Angel Food Cake mix
2 tbsp powdered sugar

Filling
5 cups (5 medium) thinly sliced peeled apples
¾ cup granulated sugar
¼ cup flour
1 tsp ground cinnamon
1 tsp vanilla extract
1 tbsp butter

Praline topping
¼ cup butter
½ cup packed brown sugar
2 tbsp half and half or milk
½ cup chopped pecans

Heat oven to 350.  Grease a cookie sheet pan and line bottom of pan with waxed paper (this keeps your sponge cake from crisping).  Prepare cake batter as directed on package.  Pour batter into wax-lined pan.  Bake for 17 to 22 minutes or until golden brown and cracks in cake appear dry.

In the meantime, place a clean towel on a flat surface.  Lightly sprinkle powdered sugar evenly onto towel.  Once your cake is out of the oven, loosen the edges of the cake with a spatula and invert onto the towel.  Remove pan and waxed paper, carefully.  Starting with the long side, roll the cake up in the towel and cool for 45 minutes or until completely cool on a baking rack.

Cooling

Combine apples, sugar, flour, cinnamon and vanilla extract in a bowl, toss lightly. (I actually went ahead and prepped my praline while I waited for it to cool, but you can wait and do it after you have everything rolled up if you prefer.)

To assemble, unroll cooled cake, remove towel.   

Unrolled cake

Spread apple mixture over cake, dot with butter.  Carefully re-roll cake loosely.  

Rolled cake

In 1-quart saucepan, melt ¼ cup butter, stir in brown sugar and half-and-half.  Slowly heat to boiling and remove from heat.  Stir in pecans and spread mixture over the top of the cake.  

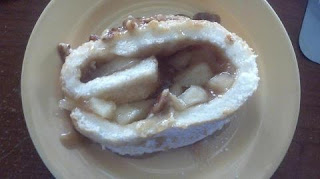
Finished product


It looks fantastic.  Here's hoping it tastes as good as it looks!  I'll let you know.

Nom, nom, nom...